¶ Description of interval shooting function (Intervalometer)
When the camera is connected to the tracker with a shutter release cable, you can use the built-inintervalometer.
This function enables automatic continuous shooting and supports a variety of advanced shooting modes, suitable for scenes such as deep space photography and time-lapse photography.
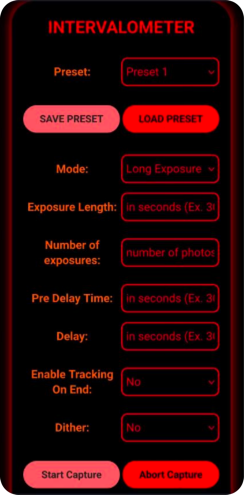
¶ 1. Preset function (Preset)
The Preset button is used to save the current interval shooting parameters.
How to use:
After setting all parameters:
Press the Preset button.
That’s it:
Save current interval shooting settings
In this way, the same parameters can be quickly recalled when shooting next time without resetting.
¶ 2. Intervalometer Modes
The system provides three main shooting modes, and users can choose the corresponding mode according to the shooting target.
¶ # 1. Long exposure mode (Long Exposure)
This mode is used for traditional deep-sky imaging.
Applicable scenarios:
- nebula imaging
- Star cluster photography
- Milky Way deep sky photography
- Long-term continuous exposure shooting
Features:
The device will follow the set parameters:
Automatically perform long exposures continuously
This mode is the standard working mode for deep space photography.
¶ # 2. Day Time Lapse
This mode is used to create time-lapse photography (Time-lapse).
Applicable scenarios:
- Sunrise and sunset time-lapse
- Cloud movement delay
- City time-lapse photography
- Wide-angle night sky time-lapse photography
Description:
Despite its name, this mode:
can also be used for wide-angle starry sky time-lapse photography at night
Especially suitable for:
- Wide-angle starry sky time-lapse
- Milky Way time-lapse
¶ # 3. Day Time Lapse Pan
This mode creates time-lapse sequences with slow camera movement.
Applicable scenarios:
- Time-lapse panning photography
- Sky movement delay
- Landscape time-lapse animation
Features:
During filming:
The camera will move slowly along the main axis of the tracker
Which results in:
Pan effect
¶ # Important suggestions
When using this mode:
It is recommended to set the tracker to Travel Mode
This works:
- Improve structural stability
- Ensure the correct direction of movement
- Avoid mechanical interference
¶ 3. Long Exposure Mode Parameter Description (Long Exposure Mode)
In long exposure mode, multiple key parameters can be set to control the shooting process.
¶ # 1. Pre Delay Time
This parameter is used to set:
Waiting time before starting shooting
Unit:
seconds
¶ # Function
After starting shooting:
The device will:
After waiting for the set time
Start shooting again.
¶ # Typical uses
This function is commonly used for:
- Avoid key vibration affecting the first photo
- Allow stabilization time for the equipment
- Wait for the environment to stabilize (such as the wind stops)
Recommended settings:
5–10 seconds
¶ # 2. Exposure interval (Delay)
This parameter is used to set:
The time between two exposures
Unit:
seconds
¶ # Function
After each exposure:
The device will wait for:
Set Delay time
Then:
Start next exposure.
¶ # Setting suggestions
Suggestions:
Delay ≥ camera exposure time
Common uses:
- Control camera cache time
- Avoid shooting interruptions
- Ensure exposure continuity
¶ # 3. Disable Tracking on End
This function is used to control:
Whether to continue tracking after shooting is completed.
¶ # Function description
When this feature is enabled:
After all filming is complete:
tracker will automatically stop tracking
¶ # Applicable scenarios
It is recommended to enable it under the following circumstances:
- Unattended shooting for long periods of time
- Schedule tasks to end automatically
- Need to save power
If you need to continue shooting manually:
This feature can be turned off.
¶ 4. Typical application examples
The following is a reference for common shooting settings.
¶ # Deep sky photography example (recommended)
Mode:
Long Exposure
Recommended parameters:
- Pre Delay: 5–10 seconds
- Delay: 1–3 seconds
- Disable Tracking on End: open
Applies to:
- nebula imaging
- Star cluster photography
- Deep space long exposure
¶ # Starry sky time-lapse photography example
Mode:
Day Time Lapse
Recommended parameters:
- Delay: Set as needed
- Use wide angle lens
- Recommended focal length ≤100mm
Applies to:
- Galaxy time lapse
- Starry sky movement delay
¶ # Panning time-lapse photography example
Mode:
Day Time Lapse Pan
Suggestions:
- Use shipping mode
- Keep equipment stable
- Choose a lower movement speed
Applies to:
- Starry sky panning delay
- Landscape time-lapse photography
¶ 5. Key usage tips
To ensure that the interval shooting function works properly, please note:
- The shutter control cable must be used to connect the camera
- Make sure all parameters are set correctly before shooting
- It is recommended to use pre-delay time to reduce the impact of vibration
- It is recommended to use long exposure mode for deep space photography
- For time-lapse photography, it is recommended to choose the corresponding mode according to the scene.
Properly setting interval shooting parameters can significantly improve shooting efficiency and reduce human intervention.